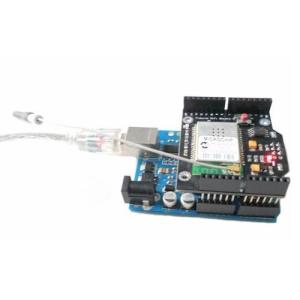
SPI WiFi Shield Module Arduino Compatible
Getting you Arduino into WiFi network is not a fresh news any more. We introduced our
UART wifi module which easily gets your Arduino into wifi. So why this one? Another Wifi module? Is it necessary?
Yes, it is definitely necessary. Users who use
UART wifi module will find that the operation is very easy, and progrmming is pretty easy, too. Basically once you configured it well, you don't need to do further configuring work in the future until the wifi network changes. Each time while it is powered up, it accesses to the wifi network automatically. However, the data speed may not satisfy your needs. Because the data go through UART, and UART speed is limited.
Well, this new Arduino WiFi Shield sends and receives data through SPI interface. The max data speed is 2Mbps. Basically you can tranmit picture or vedio wirelessly. Also, we thie new shield supports AES encryption, more safe while transmitting your data. This shield requires much programming code. So if you are Arduino users, you should at least use ATMega328 board.
So here is the difference:
Feature :
1,Compatible with Arduino UNO, Mega, Duemilanove and so on
2,Compatible with most none-Arduino platform with SPI such as PIC
3,Power: 5V DC
4,Interface: SPI
5,Plug and play solution
6,Compatible with Arduino UNO, Diecimila, Duemilanove and Mega series
7,IEEE Std. 802.11b/g/n compatible
8,Data Rate: 1 and 2 Mbps
9,Uses SPI for host communication (max speed 25MHz)
10,Easy access reset button on-board
11,External antenna with high sensitive
12,Solder-switchable interrupt pin usage between INT0 (port D, pin 2) and digital pin 8 (port B, pin 0)
13,16 Mbit on-board DataFlash, can be used to store webpages, sensor logs, etc.
14,Extra port to facilitate usage for non-Arduino platform such as PIC.
15,Supports 802.1x, 802.1i security: WEP, WPA-PSK, and WPA-2-PSK.
16,Hardware Security Engine for AES and RC4-based ciphers
17,Support AdHoc.
Test With Arduino
1. Pug in the module into Arduino
2. Change the code
Open the example of WebServer in Arduino IDE, then make the following changes:
// Wireless configuration parameters ----------------------------------------
unsigned char local_ip[] = {192,168,1,122}; //configure IP address of this module, usually one bewteen 192.168.1.100~192.168.1.199
unsigned char gateway_ip[] = {192,168,1,1}; // router or gateway IP address, usually do not need to change it.
unsigned char subnet_mask[] = {255,255,255,0}; // subnet mask for the local network, usually do not need to change it.
const prog_char ssid[] PROGMEM = {"elechouse"}; // SSID of networks, max 32 bytes. As shown in the picture above, SSID is “elechouse”
unsigned char security_type = 3;// 0 - open; 1 - WEP; 2 - WPA; 3 - WPA2 As shown in the picture above, mine is WPA2
// WPA/WPA2 passphrase
const prog_char security_passphrase[] PROGMEM = {"12344321"};// max 64 characters
// WEP 128-bit keys, Since my security type is WPA2, no need to change anything in the following code.
// sample HEX keys
prog_uchar wep_keys[] PROGMEM = { 0x01, 0x02, 0x03, 0x04, 0x05, 0x06, 0x07, 0x08, 0x09, 0x0a, 0x0b, 0x0c, 0x0d, // Key 0
0x00, 0x00, 0x00, 0x00, 0x00, 0x00, 0x00, 0x00, 0x00, 0x00, 0x00, 0x00, 0x00, // Key 1
0x00, 0x00, 0x00, 0x00, 0x00, 0x00, 0x00, 0x00, 0x00, 0x00, 0x00, 0x00, 0x00, // Key 2
0x00, 0x00, 0x00, 0x00, 0x00, 0x00, 0x00, 0x00, 0x00, 0x00, 0x00, 0x00, 0x00 // Key 3
};
// setup the wireless mode
// infrastructure - connect to AP. If you connect to a router, this is the choice.
// adhoc - connect to another WiFi device
unsigned char wireless_mode = WIRELESS_MODE_INFRA;
Then upload the code to Arduino.
3. Result
After the IND LED is on, in your browser, visit http://192.168.1.122